Creating a Differential Sensor In Home Assistant
- Matt Zaske
- March 25, 2024
- 3 minutes
If you've fiddled enough in Home Assistant over time, you might have encountered the situation in which it is useful to trigger off of, or simply display, a calculated value. There are a few different ways this can be accomplished but this post focuses on creating a specific sensor to do both: be used as a trigger value for automation, and also displayed neatly in a dashboard.
The Basic Need
I have all sorts of temperature and humidity sensors throughout the house and outside the house. I personally like the simplicity, size, and battery duration of the Aqara zigbee sensors, but they must be in range of the zigbee network (or HA USB dongle) to behave. I also have a Tempest weather station which exposes its sensors via its API through a HACS integration, which is useful for the weather data and accurate outside temperature.
But I also have a couple of outbuildings where it's useful to monitor the interior temperature. In those cases, they're too far away from the interior zigbee network to behave, but I have WiFi access, so I use the little Shelly H&T original WiFi-enabled sensors. They work great, give me accurate data, and the battery performance is … okay. They tend to eat batteries in the deep of winter, averaging one per month, but it's a price I'm willing to pay at this point for the data.
It's very useful to see at a glance the difference in temperature, so to do that I create … another sensor!
Time for a Template
As I've done before, I jump into my /config/mz-templates.yaml file to add a simple sensor:
- sensor:
- name: "Temp 1 and Temp 2 Difference"
unique_id: "sensor.temp1_temp2_diff"
unit_of_measurement: "°F"
state: >
{% set first = states('sensor.temp1_temperature') | float %}
{% set second = states('sensor.temp2_temperature') | float %}
{%- if is_number(first) and is_number(second) %}
{%- set tempdiff = (second - first) | float | round(2) | abs %}
{{ tempdiff }}
{%- else %}
N/A
{%- endif %}
state_class: measurement
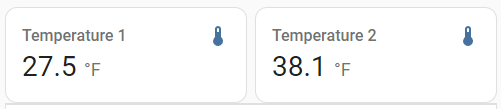
device_class: temperatureFor example, the temp1 and temp2 sensors would show up like this in the dashboard:
The state: declaration in the yaml configuration does a couple of simple things:
- Obtains the temperature values (as floating points) for the two sensors in question;
- Does a quick "sanity check" to validate they are both numeric in value (or outputs
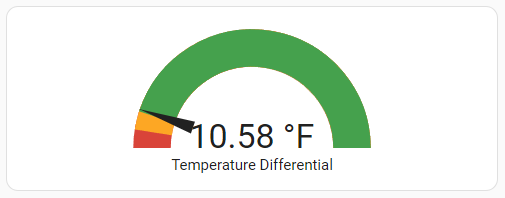
N/Aotherwise); and - Calculates the absolute value difference between the data points.
The first time I set up the diff I chose to go without absolute value as I expected the temp2/second sensor to have a value greater than temp1/first. I later added the abs conversion to make the needle gauge behave better. Your mileage and needs will vary, especially if you're using a specific range/value to trigger or conditionally execute automations. After the sensor is configured I can add the sensor.temp1_temp2_diff sensor to a needle gauge and my dashboard feature is complete:
Simple and Effective
This was a useful addition to one of my HA dashboards to visually identify if supplemental heating is necessary to turn on or, during the non-winter months, if it's useful to open some windows.
Little things like these sensors really add a level of power to what can be done in Home Assistant. Good luck!
Recent Posts
Past Speaking Engagements
I was a speaker at MMSMOA, May 3-7, 2026!

I was a speaker at MMS Music City Edition, October 12-15, 2025!

I was a speaker at TCSMUG Autopilot/OSD Day, July 15, 2025!
![]()
I was a speaker at MMSMOA, May 4-8, 2025!
I was a speaker at BrainStorm K20 Wisconsin Dells, March 9-11, 2025!

I was a speaker at MMS Flamingo Edition, October 20-23, 2024!

I was a speaker at TCSMUG OSD Day, July 31, 2024!
![]()
I was a speaker at NWSCUG, July 19, 2024!
![]()
I was a speaker at MMSMOA, May 5-9, 2024!
I was a speaker at BrainStorm K20 Wisconsin Dells, March 10-12, 2024!
I was a speaker at MMS Miami Beach, October 29-November 1, 2023