Getting Started with WSL - A Quick Installation Guide
- Matt Zaske
- April 29, 2024
- 4 minutes
I've been using the Windows Subsystem for Linux (WSL) almost as long as it's been generally available, and I use it for all sorts of things. As I prepare for my upcoming sessions at MMSMOA, specifically the "happy hour" session I'm hosting with Jeff, I am setting up some new instances of WSL on clean hardware (both physical and VM) and figured it'd be a good opportunity to note the (usually) quick steps to get a basic installation of Linux up and running.
Prerequisites
OS Support
I'm running everything in Windows 11 (23H2) these days, and according to Microsoft all current versions of Windows 10/11 support WSL. At this point if you're not running a compatible version with WSL, you might have a larger problem (update your stuff if possible).
Enable Virtualization
On physical hardware, you'll need to jump into your device's firmware/BIOS settings and ensure virtualization options are enabled. The manner in which you do this step will depend on your hardware manufacturer and firmware version, but it's a setting exposed somewhere in the firmware settings.
On virtual hardware (for this example, Hyper-V), you'll need to run a special command in an administrative powershell window, like this:
Set-VMProcessor -VMName YOUR-HYPER-V-VM-NAME -ExposeVirtualizationExtensions $trueOther virtualization platforms (VMWare, Proxmox, etc.) will have their own requirements and enablement hooks.
Select Your Distro
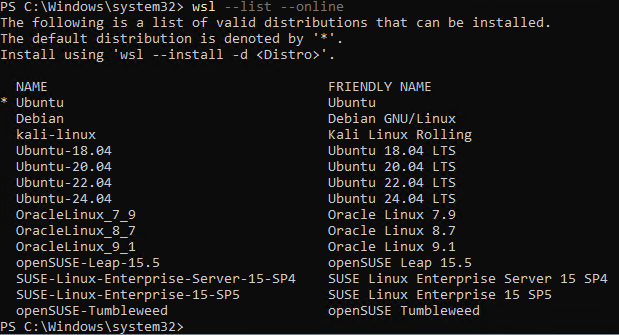
There's a couple of ways to get started with WSL distros, and you can always add/change as you go. I like to "simplify" my setup by picking the distro from the beginning, and that can be done by using the following command (in administrator shell):
wsl --list --onlineThis will output a list of available distributions, like so:
Install Away!
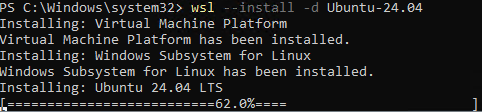
Now, I'm not sure if it's just me or not, but Microsoft made some changes to the installation process recently. In the past there were a handful of "extra" steps that were best handled manually, but on a fresh install of Windows 11 23H2, fully updated, the wsl command really took care of all the different necessary details, including enabling the Windows virtualization platform bits and other Windows features. Run the following in an administrative shell:
wsl --install -d Ubuntu-24.04I chose to install Ubuntu 24.04 LTS for the demo machines, and invoking the command above started the process very automatically:

After the Virtual Machine Platform feature was installed, it automatically started installing WSL and Ubuntu 24.04 LTS:
After a minute or two, all was good and I was instructed to reboot:

Time To Reboot!
I followed the instructions and rebooted the system, logging back in to complete the onboarding steps. I was also working on a different machine, so after a minute or two I was surprised to see the Ubuntu "shell" start up automatically and actually complete the installation on its own! I didn't have to launch Ubuntu from the Start menu to get this:

Again, after a few minutes I was presented with the prompt to create my account:

Once my account was created, I was at the "landing" screen with a fresh install ready to go!

This is also where I'd mention that using Windows Terminal to manage your WSL sessions (and everything else like Powershell and command prompt) is a great choice, too! Super customizable and easy to use...with tabs for all the sessions!
It's Remarkably Simple
Getting an installation of WSL in place historically has been more complex, and I've been caught even recently in 2024 forgetting to enable the hardware virtualization. For the most part, though, in recent versions of Windows this process has become significantly simpler and less burdensome. There's also a way to install WSL and your preferred distro via the Store, but doing so will often (at least to my more recent experience) lead to some frustration due to the dependencies/prerequisites. If installing from the Store, you'll have to follow the manual installation instructions and ensure the virtualization stuff has been added to the host OS. These commands are now wrapped into the wsl --install command, so weirdly enough the command line method is actually faster/"better" for the process.
Now You Have Linux!
What you do with WSL is entirely up to you, but I have found it incredibly useful for all sorts of things, from connecting to hosts with SSH key auth, to doing local development/testing work, to even interacting with MS Graph and other APIs...right within Visual Studio Code!
Good luck on your own WSL journey!
Recent Posts
Upcoming Speaker Events
I am speaking at MMSMOA, May 3-7, 2026!

Past Speaking Engagements
I was a speaker at MMS Music City Edition, October 12-15, 2025!

I was a speaker at TCSMUG Autopilot/OSD Day, July 15, 2025!
![]()
I was a speaker at MMSMOA, May 4-8, 2025!
I was a speaker at BrainStorm K20 Wisconsin Dells, March 9-11, 2025!

I was a speaker at MMS Flamingo Edition, October 20-23, 2024!

I was a speaker at TCSMUG OSD Day, July 31, 2024!
![]()
I was a speaker at NWSCUG, July 19, 2024!
![]()
I was a speaker at MMSMOA, May 5-9, 2024!
I was a speaker at BrainStorm K20 Wisconsin Dells, March 10-12, 2024!
I was a speaker at MMS Miami Beach, October 29-November 1, 2023